 |
|
 |
|
|
|
Master Gardener Presentation Notes > Pressing Flowers Pressing FlowersSeptember 10th, 2002: Pressed Flowers by Carol Johannes

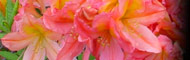
Sample pressed flowers
Pressing flowers is so simple. All you need is a pair of clippers and a phone book! Of course, you can also use a traditional press that you have bought or made. This usually consists of layers of corrugated and absorbent paper sandwiched between two pieces of cardboard and tightened with bolts and wing nuts. With either method, the condition of the flowers when you pick them will determine the outcome. Pressing won�t make blemished flowers look better. In fact, it usually accentuates the blemish, so choose flowers that are as perfect as possible. Another factor affecting the quality of pressed flowers is their dryness. The dryer they are when picked, the better their color retention. As with harvesting flowers for drying, the optimum time to pick flowers for pressing is on a sunny day after the dew has dried but before the sun has caused them to wilt. Once you have harvested your flowers, press them as soon as possible. If they start to wilt, put them in a vase with a little water then cut off the wet part of the stem before you press. You can try pressing most any plant, but those with petals or leaves that have high moisture content will not press well. If a plant seeps moisture when you squeeze a petal or leaf between your fingers, it is not a good candidate for pressing. Also avoid dimensional plants. You can, however, press individual petals or dissected parts of these plants. It�s fun to press smaller plants in their entirety (not just the heads) or a branch of small leaves. To press flowers in a phone book, simply place the plants in the book, leaving ten or more pages between each page of plants. Sometimes the plants� moisture will dampen the pages can causing slow drying and even mildew. A way to avoid this is to first put the plants between two sheets of absorbent paper, such as a folded sheet of white construction paper, then insert this in the phone book. If the paper becomes too moist, you can easily change it. This also makes the flowers easier to find in the phone book. A few things to remember are:
Now, stack some books or other heavy objects on top of the phone book to weight it down and store it in a dry place. One friend even puts her flower drying books on top of her clothes dryer! Check the plants for dryness after a week. The flowers will be dry when they feel crisp and the stem remains erect when you pick it up. Once the plants have dried, they need to be removed from the pressing paper but kept under compression to protect the petals and prevent them from reabsorbing moisture. Storing pressed plants in a dry phone book is a fine idea, but since they are so flat now, they can be difficult to find. A way to prevent this is to arrange them on sheets of paper which are put in labeled file folders. These folders can then be placed between the pages of a phone book. Resist any temptation to store them in plastic bags for any remaining moisture can cause them to mildew. Sometimes the plants can stick to the paper while drying. If this happens, tease them off with a small, soft brush. A pair of tweezers used by stamp collectors is useful in moving and placing the plants. PRESSING FLOWERS ~ QUICK METHODSIf you are in a hurry, there are a couple of methods you can use to press flowers and leaves quickly. One method is to use a microwave. Place the plants on sheets of absorbent microwave safe paper (such as white construction paper folded in half). Several layers of plants can be pressed at one time. Put a sheet of paper in the microwave to help absorb moisture, add the paper with the plants, another sheet of paper, then top with a heavy microwave safe object such as one or more casserole dishes. For good compression, try to cover as much of the paper as possible with the dishes. Microwaves and plant moisture content vary, so be willing to experiment. If you are pressing only a few small, dry flowers, try 10 to 30 seconds on high. Increase the time with the size and moisture content of the flowers. If the paper gets moist, replace it and keep heating until the plants are dry and flat. Another quick method is the iron. Place the plants between two
sheets of absorbent paper and press with an iron set on low. This is especially
good for leaves, but use caution when trying to press delicate blossoms. Here are some useful web site links:
What can you make with your flowers once they are pressed? Here are just a few ideas: keepsake candles using pedals from wedding bouquets or funeral flowers, placemats, bookmarks, greeting cards, sun catcher, picture, decorate a simple picture frame, coasters, key chains, magnets, vases, glass containers, etc. Note: If you are making something with glass, look for one with UV protection (available at most glass shops). To make your own press: Take 2 pieces of 3/4" plywood and drill 4 holes, one in each corner. Insert 4 eight inch bolts with wing nuts. Layer two pieces of parchment (or other absorbent) paper between each piece of corrugated cardboard.
|
||
|
Saint John's Community Garden Society
Copyright � 2005 College of Saint
Benedict | Saint John's University |
||


