HONORS OPTION: GEN CHEM 1
Fall 2006
(self note: contact Jason Cross to ensure usrname/passwd
correct and to ensure access to /common folder.)
Part 1: Proteins and Enzymes - on PC Network
Part 2: Intermolecular Forces - IMFs
Part 3: HIV Protease: an Enzyme at Work - Video
Part 4: Molecular Modeling of the
HIV
Protease/Inhibitor Complex
In this exercise, you will study the structures of HIV protease and an
inhibitor which binds to the protease. You will use a powerful molecular
modeling program called VMD, which was developed at the University Illinois
(Champaign/Urbana). For more information, see the website below
OpeningVMD
First you must log into the Silicon Graphics network. For a user name,
type in final01 up to final12 as assigned in lab. The
password is: f03.final. On the top menu bar, select Applications, Chemistry, VMD. Three windows
will open for you.
- VMD Main - contains menu bar for running VMD
- VMD 1.8.1 OpenGL Display - displays molecules
- VMD - contains text and place for command line input
Our first step is to load our molecule. A
pdb file,
1HSG.pdb, that contains the atom coordinates of HIV protease and an
inhibitor is provided with
the tutorial.
- 1
- Choose the File
 New
Molecule... menu item Fig
1(a) in the VMD Main window. Another window, the Molecule File Browser
(b), will appear in your screen.
- 2
-
Click Up One Directory until
the list of folders doesn't change anymore. The scroll down the list and
select with your left mouse button /usr. A new list of folders
will appear. Select /people and continue with the following
selections: /faculty then /chem then /hjakubow
. At this point no files are shown but rather the work Permission
Denied. In the line that shows the path, type in
immediately after hjakubow (with no spaces) /common. A list of files
should now appear. Select 1HSG.pdb and then Open.
-
Note that when you select the file, you will be
back in the Molecule File Browser window. In order to actually load the file
you have to press Load (d). Do not forget to do this!
Figure 1: Loading a Molecule.
 |
Now, HIV protease is shown in your screen in the OpenGL Display window. You may
close the Molecule File Browser window at any time. You will see
many red dots around the protein. These represent the oxygen of water
molecules that co-crystallized with the protein that was used to determine the
x-ray structure.
In order to see the 3D structure of our protein we will use the mouse and its
multiple modes.
- 1
- While holding the left button pressed over the protein in the OpenGL
Display, move the mouse and explore what happens. This is the rotation mode of
the mouse and allows you to rotate the molecule around an axis parallel to the
screen Fig.
2(a).
Figure 2: Rotation modes.
 |
- 2
- If you press the second button and repeat the previous step, the rotation
will be done around an axis perpendicular to your screen (b) (For Mac users,
the second button is equivalent to press the command key while holding the
mouse button pressed).
- 3
- In the VMD Main window, look at the Mouse menu (Fig
3). Here, you will be able to switch the mouse mode from Rotation
to Translation or Scale modes.
- 4
- The Translation mode will allow you to move the molecule around the
screen while holding the first button pressed.
Figure 3: Mouse modes.
 |
- 5
- The Scale mode will allow you to zoom in or out by moving the mouse
horizontally while holding the first button pressed.
It should be noted that the previous actions performed with the mouse do not
change the actual coordinates of the molecule atoms.
Another useful option is the Mouse
 Center
menu item. It allows you to specify the point around which rotations are done.
- 6
- Select the Center menu item and pick one atom at one of the ends of
the protein. (The cursor should display a cross.)
- 7
- Now, press r, rotate the molecule with the mouse and see how your
molecule moves around the point you have selected.
VMD can display your molecule using a wide variety of drawing styles. Here,
we will explore those that can help you to identify different structures in the
protein.
- 1
- Choose the Graphics
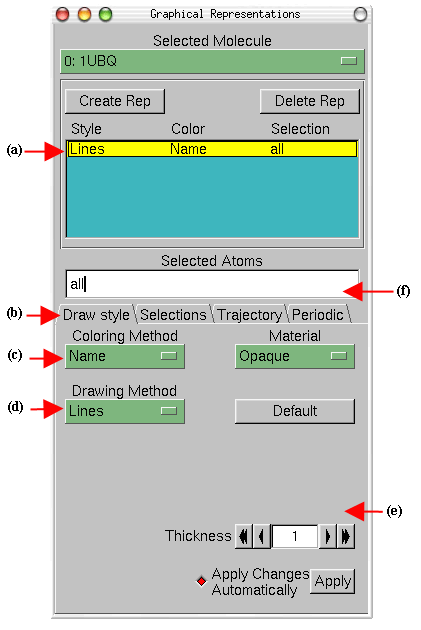
 Representations... menu item. A window called Graphical Representations
will appear and you will see in yellow Fig
4(a) the current graphical representation used to display your molecule.
- 2
- In the Draw Style tab (b) we can change the style (d) and color (c)
of the representation. In this section we will focus in the drawing style (the
default is Lines).
- 3
- Each drawing style has its own parameters. For instance, change the
Thickness of the lines by using the controls on the right bottom part (e)
of the Graphical Representation window.
- 4
- Now, choose from Drawing Method the VDW (van der Waals) menu
item. Each atom is now represented by a sphere. In this way you can see more
easily the volumetric distribution of the protein.
Figure 4: Graphical Representations
window.
 |
- 5
- In order to see the arrangements of atoms in the interior of the protein,
use the new controls on the right bottom part of the window (e) to change the
Sphere Scale to 0.5 and the Sphere Resolution to 13. Be aware
that the higher the resolution you choose, the slower the display of your
molecule will be.
- 6
- Note that in the Name coloring method, each atom has its own color, i.e: O
is red, N is blue, C is cyan and S is yellow.
- 7
- Press the Default button. This allows you to return to the default
properties of the drawing method.
The previous representations allows you to see the micromolecular details of
your protein. However, more general structural properties can be seen by using
more abstract drawing methods.
- 8
- Choose the Tube style under Drawing Method and observe the backbone
of your protein. Set the Radius at 0.8.
- 9
- By looking at your protein in the tube mode, can you distinguish how many
helices,
β
sheets
and coils are present in the protein?
The last drawing method we will explore here is called Cartoon. It
gives a simplified representation of a protein based in its secondary structure.
Helices are drawn as cylinders,
β
sheets as solid
ribbons and all other structures as a tube. This is probably the most popular
drawing method to view the overall architecture of a protein.
- 10
- Choose the Cartoon style and set the Beta Sheet Thickness as
3, the Helix/Coil Radius as 1.5.
- 11
- Identify now how many helices, betasheets and coils are present in the
protein.
- 1
- Now, let's modify the colors of our representation. Choose the ResType
coloring method Fig.
4(c). This allows you to distinguish non-polar residues (white), basic
residues (blue), acidic residues (red) and polar residues (green).
- 2
- Select now the Structure coloring method (c) and confirm that the
cartoon representation displays colors consistent with secondary structure.
Let's look at different independent (and interesting) parts of our molecule.
- 1
- In the Selected Atoms text entry Fig.
4(f) of the Graphical Representations window delete the word all,
type helix and press the Apply button or hit the Enter key.
(Do this every time you type something.) VMD will show just the helices
present in our molecule.
- 2
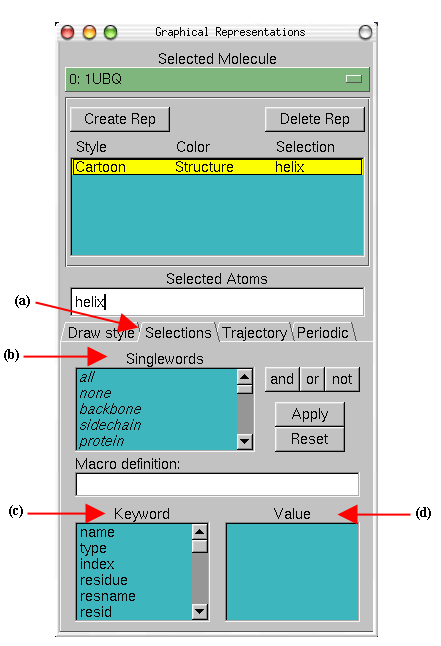
- In the Graphical Representations window choose the Selections tab
Fig.
6(a). In section Singlewords (b) you will find a list of possible
selections you can type. For instance, try to display
β
sheets instead
of helices by typing the appropriate word in the Selected Atoms text
entry.
Combinations of boolean operators can also be used when writing a selection.
- 3
- In order to see all that is not helix and not
β
sheet, type the
following (not helix)and(not betasheet)
- 4
- In the section Keyword (c) of the Selections tab (a) you can
see properties that can be used to select parts of a protein with their
possible values. Look at possible values of the Keyword resname
(d). Display all the Lysines and Glycines presents in the protein by typing
(resname LYS)or(resname GLY).
- 5
- Now, change the current representation to CPK style and the
coloring method to ResID by using the previous described buttons in the
Drawing Method (Style) tab. In the screen you will be able to see the different
Lysines and Glycines. How many of each one can you see?
Figure 6: Graphical Representations
window and the Selections tab.
 |
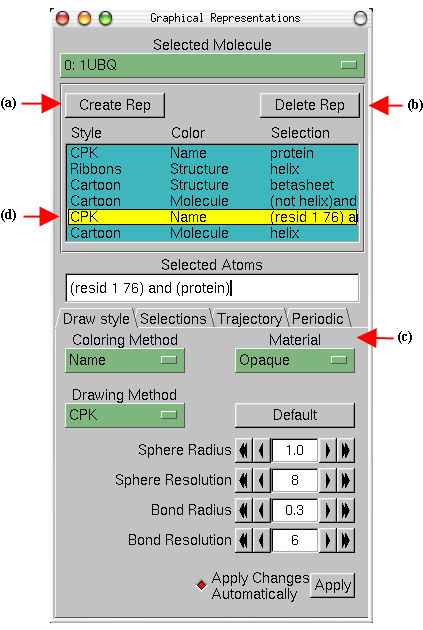
The button Create Rep Fig
7(a) in the Graphical Representations window allows you to create multiple
representations and therefore have a mixture of different selections with
different styles and colors, all displayed at the same time.
- 1
- Be sure that the current representation is in CPK style and
coloring method Name
- 2
- Set the current selection as protein.
- 3
- Press the Create Rep button. Now, using the menu items of the
Draw Style tab and the Selected Atoms text entry, modify the new
representation in order to get Ribbons as the drawing method,
Structure as the coloring method, and helix as the current
selection. Call this newly created representation b:
Figure 7: Multiple Representations
of Ubiquitin (not the protein we are studying).
 |
- 4
- Repeating the previous procedure, create the following three new
representations:
| To Display |
Drawing Style |
Coloring Method |
Selection |
| c. Protein without water |
Cartoon |
Structure |
protein |
| d. Protein Surface w/o water |
Surface |
Pos |
protein |
| e. inhibitor alone |
VDW - van der Waals |
Molecule |
(not protein) and (not water) |
| f. Protein and inhibitor |
CPK |
Name |
all and (not water) |
Double click on the representations to toggle them off and on. Display
just the Protein Surface (d) and the Inhibitor Alone (e). Toggle (e) on
and off to see how the inhibitor fits snuggly into a cavity or "active" site in
the protein. Likewise click display (c) and (e) alone. Again toggle
on and off the inhibitor (e). Experiment with other options.
- 5
- Create a final representation (g) by again pressing the Create Rep
button. Select the Cartoon drawing method, the Molecule coloring
method and type helix in the Selected Atoms entry. For this
last representation choose in the Material section (c) the
Transparent menu item.
A closer look at the inhibitor binding site
The complex you have seen above, no matter how you render it, is still quite
complicated. We have used a program called MOE (available on the SGI
network) to create a file (HIVMOECONTACTpolarH.pdb)
that shows only the inhibitor and the amino acids around it that make contacts.
Load it now.
What properties must the inhibitor and binding pocket of the enzyme have in
common to allow inhibitor binding? You will soon cover this topic in
General Chemistry (Chapter 10, Section 10.2). In essence there are
intermolecular forces - forces between molecules that are distinguished from
covalent bonds within a molecule) that allow reversible binding. In general, there
are 3 types of intermolecular forces between the inhibitor and protease (the two
different molecules) that may be involved here:
- ion...ion forces: between a
postively or negatively charged ion in the protease binding pocket and the oppositely charged
ion in
the inhibitor (in this case there are none)
- H -bonds: electrostatic
interactions between a slight positive charge on a H atom on one molecule and
a slight negative charge on a N or O atom on the other molecule. H atoms
are slightly positive, and N and O atoms are slightly positive if they are one
of the atoms in a polar covalent bond.
- Hydrophobic (water fearing): You
know that certain types of liquids (oil, gasoline) do not dissolve in water.
The molecules that make up these liquids do not usually contain polar covalent
bonds, and hence do not interact strongly with water through H bonding. The
prefer to interact with themselves, causing them to "shun water" and be
insoluble in water. Hydrophobic interactions between molecules occur
because nonpolar parts of one molecule prefer to interact with nonpolar parts
of another molecule. This was the
basis for the interaction of your nonpolar dyes in Lab 1 with the nonpolar
beads.
These same types of interactions allow binding of the inhibitor to HIV
protease. Their binding surfaces are complementary. The list below
shows the contacts between HIV protease and the inhibitor. Try to identify
them in the active site file you just loaded.
Important Note: The first pdb file you
loaded did not contain H atoms, since they are too small to be detect when the
x-ray structure of the molecules was determined. In the second pdb file
showing the active site, "polar" H atoms have been added to the protein and
inhibitor by another software program called MOE. The chart below shows the H bonds
occurring between N and O atoms, not between Hs on N and O atoms and N and O
atoms. In the cases listed, a H atom is assumed to be linked by a covalent bond
to one of the listed O or N atoms.
|
Atom
number |
Type
contact |
Protease chain |
Amino
acid(#), atom |
Atom on
inhibitor |
|
23 |
H-BOND
|
A |
ASP25.OD1 |
MK1902.O2 |
|
37 |
H-BOND |
B |
ASP25.OD1 |
MK1902.O2 |
|
38 |
H-BOND |
B |
GLY27.O |
MK1902.N4 |
|
39 |
H-BOND |
B |
ASP29.OD2 |
MK1902.O4 |
|
101 |
HYDROPHOBIC |
A |
LEU23.CD2 |
MK1902.C16 |
|
102 |
HYDROPHOBIC |
A |
VAL32.CG2 |
MK1902.C6 |
|
103 |
HYDROPHOBIC |
A |
ILE47.CD1 |
MK1902.C7 |
|
104 |
HYDROPHOBIC |
A |
ILE50.CG1 |
MK1902.C29 |
|
105 |
HYDROPHOBIC |
A |
VAL82.CG1 |
MK1902.C20 |
|
106 |
HYDROPHOBIC |
A |
ILE84.CD1 |
MK1902.C14 |
|
148 |
HYDROPHOBIC |
B |
VAL32.CG2 |
MK1902.C27 |
|
149 |
HYDROPHOBIC |
B |
ILE47.CD1 |
MK1902.C27 |
|
150 |
HYDROPHOBIC |
B |
ILE50.CG1 |
MK1902.C7 |
|
151 |
HYDROPHOBIC |
B |
ILE84.CD1 |
MK1902.C28 |
You can visualize the H bonds in VMD by:
- selecting Graphics from the VMD main window
- selecting Representations,
- creating a new representation called H bonds.
- select drawing method: H bonds
- increasing distance cutoff to 4.0.


