
Reactivity in Chemistry
Understanding Mechanism
UM2. Arrow Conventions
Symbolic Notation
Sometimes in mathematics and science we need to convey an idea based on concepts we have learned previously. In mathematics, we use a plus sign (+) to indicate that we are putting these things together; we use a minus sign (-) to indicate we are taking some of these things away. Alternatively, we could use that plus sign to indicate that we have a surplus (a positive number) or that minus sign to show that we have a deficit or a debt (a negative number).
We don't even need to think about what these signs mean because we learned about them in elementary school. We have used them so often that we instantly get the idea of what is going on. In fact, symbolic notation is really how all of mathematics works; when we see the number three, we immediately associate it with a trio of objects (***).
In chemistry, we start using this symbolic notation early on, as well. The most important symbols may be those used for the elements themselves, such as C for carbon or Fe for iron. We also use arrows, lots of different kinds of them, to convey a number of different ideas. You probably already know a little about some of these symbols, but now that you have encountered them a few times, we should review.
Conveying Relationships Between Structures
Chances are, the first arrow you encountered in a chemistry class was a reaction arrow. A reaction arrow just tells you that a change has taken place, and one thing has turned into another. The arrow points from the old thing (the thing that reacted) to the new thing (the thing that formed).
Figure UM2.1. A reaction arrow.
The reaction arrow is used in an "equation of reaction". The thing that reacted is called the reactant. The thing that formed is called the product. Normally the reaction is written from left to right, with the reactant on the left and the product on the right, but that isn't always necessary. The important thing is that the arrow points from reactant to product.

Figure UM2.2. An example of a reaction arrow in an equation of reaction.
The reactants and products themselves are usually drawn using symbolic structures. These structures might be complete Lewis or Kekule structures, or they might be abbreviated line structures in organic compounds. Sometimes we leave out the structure and just use the formulae of the compounds, although we are losing some information that way. Sometimes in biochemistry a simple acronym is used to stand for the compound, such as NADH or AcSCoA, because the structures are relatively complicated. Nevertheless, the idea implied by the reaction arrow is always the same.
Sometimes, you may see a whole series of compounds linked from one to the next by reaction arrows. That means we are dealing with a series of reactions. We might be looking at a synthesis, in which an initial reactant forms a first product, which becomes the reactant for the next reaction, in a slow, building-up process that eventually produces a desired target compound.
The reaction arrow seems pretty simple to draw, although you do have to be careful not to draw the wrong kind of arrow. This one is just a straight line with an arrowhead at one end. Sometimes, the line can have a slight curve to it. That's usually because a series of reactions are connected in a cycle, and the series of reactions must lead back to the beginning. That's how we might show a catalytic cycle, for example.
Just to see how we can sometimes convey the wrong idea by drawing the wrong kind of arrow, consider something called a "retrosynthetic arrow". A retrosynthetic arrow differs from a reaction arrow because a retrosynthetic arrow shows what a compound is made from. In other words, it points from the product of a reaction (or series of reactions) to the reactant. Retrosynthetic arrows are used to illustrate possible sources of a compound of interest, whether the compounds are made in nature, industrially, or in a lab.

Figure UM2.3. A retrosynthetic arrow.
That sounds like it could be confusing, but fortunately a retrosynthetic arrow looks very different from a reaction arrow. It is an outline of an arrow, rather than a simple line and arrowhead. By choosing the right kind of arrow, you can clearly convey whether you are considering a reaction that you could do with a compound or wondering where the compound came from originally.

Figure UM2.4. An example of a retrosynthetic arrow.
Biosynthetically, cholesterol is made from squalene, a polyunsaturated hydrocarbon. Squalene is an example of a class of compounds called terpenes, recognizable by their five-carbon monomer units.
Reaction arrows can be more subtle in the case of reversible reactions, or equilibrium processes. An equilibrium between two different compounds or groups of compounds can be illustrated using a combination of two arrows: one pointing from left to right and one pointing from right to left. Drawing the arrow that way implies that the reaction could proceed in either direction.

Figure UM2.5. An equilibrium arrow.
Usually, the individual arrows within that double, equilibrium arrow are drawn with only half an arrowhead.

Figure UM2.6. An example of an equilibrium arrow.
Sometimes, one of the individual arrows in the equilibrium arrow is drawn a little longer than the other one. This symbol is meant to imply that, although the reaction is reversible, it proceeds more readily in one direction than the other. The left-to-right arrow may be the longer one, indicating that the reaction favours products; presumably it is exothermic (or exergonic, anyway). The right-to-left-arrow might be the longer one, indicating that the reaction mostly stays on the reactant side; it must be endothermic (or at least endergonic).

Figure UM2.7. An equilibrium that lies to the left, favouring more reactants.
OR

Figure UM2.8. An equilibrium that lies to the right, favouring more products.
There is another symbol that people sometimes confuse with an equilibrium arrow. It is a resonance arrow. In a resonance arrow, one straight line has an arrowhead on each end, so that it points in two different directions. It is similar in appearance to an equilibrium arrow, but it has only one stem, whereas an equilibrium arrow has two separate ones.

Figure UM2.9. A resonance arrow.
The resonance arrow indicates that the molecule behaves like both structures at the same time. This situation is termed a "superposition of states" in quantum mechanics.

Figure UM2.10. Another concept of a resonance arrow.
For example, in a diazomethane molecule, the resonance structures convey that there is a buildup of negative charge on two separate atoms: both the carbon and the terminal nitrogen. In a given situation, the diazomethane may behave one way or the other.

Figure UM2.11. An example of a resonance arrow.
A resonance arrow does not imply that two compounds can change back and forth. It doesn't even mean that they can switch back and forth extremely rapidly. It means that there are two different structures that we can draw for the compound, but that neither one describes the compound satisfactorily. In general, that's because of delocalisation. At least one electron in the compound is not restricted to one position as indicated in the structural drawing; instead, it spreads out to be in two positions at once. Remember, electrons are very small and they enjoy particle-wave duality. They don't have to behave like little objects that have to be moved. They can behave like waves that extend through space.
Curved Arrows: Bond-Making and -Breaking Events
Among the unlearned, curved arrow conventions are just a curly fluorish on a drawing of a reaction. Used properly, these symbols convey meaning to the reader and enhance our understanding of a mechanism.
A curved arrow illustrates the path taken by a pair of electrons during a reaction. The stem of the arrow starts at the electron pair in question; it's usually a lone pair, but it could also be a pi bond in some cases. The arrowhead points to the position that attracts the electrons; that might be a cation or some other electron-deficient site.

Figure UM2.12. Curved arrow notation.
For example, in a Lewis acid-base reaction, the arrow would curve from the lone pair on the Lewis base to the electron-deficient atom in the Lewis acid. It might curve from a lone pair on an oxygen atom to a boron atom.

Figure UM2.13. Curved arrow notation in a Lewis acid-base reaction.
If we follow through to show the product of the reaction, we would find that a new bond is formed. The new bond used to be a lone pair, but now it is shared between the Lewis base and the Lewis acid. The curved arrow shows the direction of electron flow. The curved arrow also highlights the transformation of that lone pair into a bond.
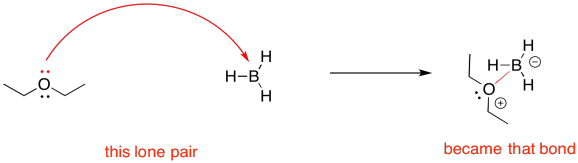
Figure UM2.14. Curved arrow notation in a Lewis acid-base reaction; a reaction arrow is also used.
Something similar happens when the Lewis base is really an alkene nucleophile. The pi bond in the alkene is transformed into a new sigma bond.
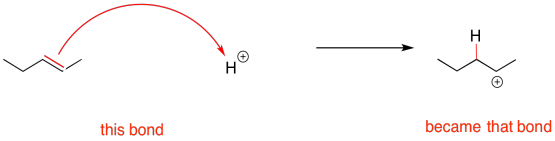
Figure UM2.15. Curved arrow notation in a Bronsted acid-base reaction, or an electrophilic addition.
Curved arrows don't just illustrate bond formation. They can also illustrate bond breaking. In a proton transfer, a sigma bond might be converted into a lone pair. That's the opposite of what we saw in the Lewis acid-base reaction.
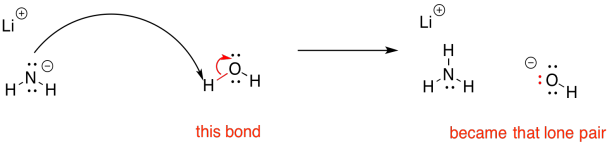
Figure UM2.16. Bond-breaking shown with curved arrow notation.
Because curved arrows illustrate transformations between non-bonding and bonding electrons, it's important to show the electrons in a mechanism. That means showing lone pairs on heteroatoms such as oxygen and nitrogen. When we do so, it underscores the changes that are occurring in that step. It makes the reaction pathway more clear on paper, and it also reinforces the physical changes in the structure of the molecule over the course of the reaction.
Working with Dative Bonds
A Lewis acid-base reaction results in a Lewis adduct. In the Lewis adduct, one partner has donated a lone pair to the other partner, forming a bond. If the Lewis acid and the Lewis base are both neutral (uncharged), then there will be formal charges on the Lewis acid-base adduct. The Lewis base has shared an entire pair of electrons to form a bond, rather than just contributing one electron to form a regular covalent bond. It will have a formal positive charge. The Lewis acid will contribute no electrons of its own, but will still gain a bond. It will have a formal negative charge. The adduct is a zwitterion: neutral overall, but containing both a positive and a negative formal charge on different atoms.

Figure UM2.17. Another Lewis acid-base reaction, this time using dative bond formalism.
Formal charges tell us something real about the structure, because there really has been a net transfer of electron density from the Lewis base towards the Lewis acid. However, there is an alternative way of showing this arrangement, using a dative bond formalism. That requires another arrow. This one is short and straight, and points from the lone pair on the neutral donor attom toward the acceptor atom.

Figure UM2.18. The concept of dative bond notation.
The dative bond arrow has something in common with the curved arrow. It illustrates the transfer of electron density from a lone pair toward an electrophile. However, it is meant to be read as static, rather than dynamic. It is structural, rather than reactive.
The advantage of the dative bond formalism is simply that it obviates the use of formal charge. That can be useful in more complicated molecules that would otherwise have lots of formal charges on different atoms. In addition, it reminds us of the transient nature of a dative bond, which usually form reversibly.
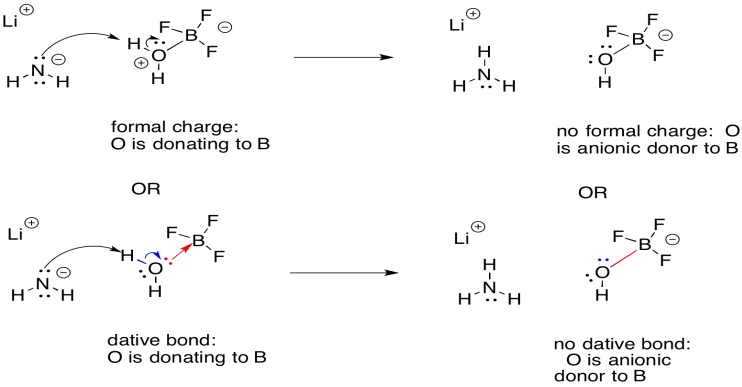
Figure UM2.19. A reaction illustrated with dative bond notation.
There's one more fine point about dative bond formalisms. Usually, the short arrow is only used to illustrate electron donation from a neutral donor. The bond from an anionic donor to an electrophile is generally drawn as a simple straight line, like any other bond. That distinction is sometimes helpful in underscoring the different types of ligands in a more complicated coordination complex.
As a result, if we were to illustrate a proton transfer involving an activated, neutral molecule, the short arrow in the neutral donor would shift to a straight line in the anionic donor.
Radicals and Single-Electron Transfers
Some reactions do not involve the movement of an electron pair, and so we need a symbol that conveys the idea of a single electron participating in a chemical change. Instead of the refular curved arrow that suggests the movement of two electrons, we use a similar arrow having only half an arrowhead. It's more like a fish hook.

Figure UM2.20. The notation for a single electron reaction.
In a single electron transfer, one electron is exchanged from a position on one atom or molecule to a position on another. We can show that using the single-electron arrow.

Figure UM2.21. An example of single electron transfer.
Note that there is a different consequence here than in a two-electron process. A two electron process typically results in the transformation of a lone pair into a bond, or vice versa. A single electron process does not. A bond requires two electrons, so when a single electron moves from one place to another, we are not forming or breaking bonds.
However, there are some one-electron processes that do entail bond formation or bond cleavage. Radical reactions involve unpaired electrons that pair up to make a bond. They might also involve bonds that break to produce unpaired electrons.

Figure UM2.22. Using single electron arrows to show a bond that breaks in half.
Radical reactions are often very different from the typical polar reactions such as acid-base reactions. Rather than being driven by electrostatic attractions, they are motivated by electron pairing and relative bond strengths. So, we might do something that would seem counter-intuitive if we are used to dealing with polar processes. In forming a bond, we would show two of those fish hook arrows coming together; the electrons are not repelling each other because they are becoming spin-paired.

Figure UM2.23. Using single electron arrows to show two radicals coupling.
In breaking a bond, we would show two arrows diverging in opposite directions. The electrons that were spin-paired in the bond are retreating, each to a different side of the original bond.

Figure UM2.24. An example of bond homolysis.
In polar reactions, we never really have arrows moving in opposite directions like that. They are drawn towards a positive position, so they move in the same direction. In radical reactions, to fish hooks meeting together signals bond formation, whereas two fish hooks leading away from each other signals bond breaking.
This site was written by Chris P. Schaller, Ph.D., College of Saint Benedict / Saint John's University (retired) with contributions from other authors as noted. It is freely available for educational use.

Structure & Reactivity in Organic, Biological and Inorganic Chemistry by Chris Schaller is licensed under a Creative Commons Attribution-NonCommercial 3.0 Unported License.
This material is based upon work supported by the National Science Foundation under Grant No. 1043566.
Any opinions, findings, and conclusions or recommendations expressed in this material are those of the author(s) and do not necessarily reflect the views of the National Science Foundation.Navigation: