The Idea...
...is to show a blasted and torn-open section of hull and the wrecked
interior within. Since the kit plastic is far too thick to represent a
realistic hull thickness, a section of the model must be cut away and
replaced with a thinner skin. An interior was placed
inside the model underneath the skin before the model is assembled. The skin &
interior are then cut and detailed.
Warning! Don't do anything stupid! If you don't know what
"stupid" means, stop right here.
- Be sure to wear safety glasses and to observe all manufacturers' safety precautions when
using the equipment suggested in this how-to.
- Knives will cut skin as easily as they cut plastic!
Probably more easily, in fact.
- Flying bits of snipped-off plastic are attracted to eyes!
- Hot metal looks like cold metal long enough to burn you!
|
Step 1...
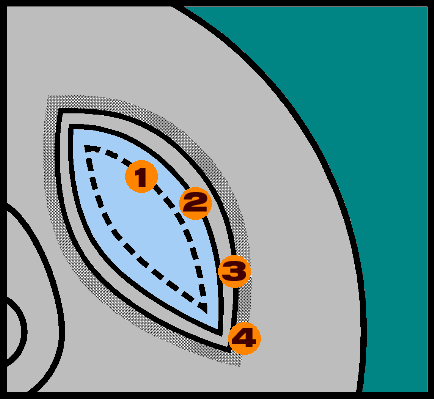
- This section of damage is from the top of the saucer and represents a hull breach from
a phaser hit with a fairly low angle of incidence, thus the final damage opening will
be an elongated hole.
- To make sure the thick kit plastic isn't visible under the damaged
hull, I cut the opening about 1/2 inch larger than the damage area.
- I next cut a piece
of .02" sheet styrene that was about 1/2" larger than the opening. I scraped
and feathered the edge so that it would more-easily blend into the existing kit surface.
- Once the plastic sheet is glued in
place, I puttied the edge.
|
 |
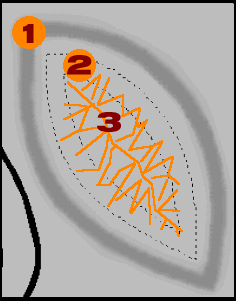
Step 2...
- After the glue and putty from Step 1 had set, I sanded the edge until the
transition from kit plastic to sheet plastic was indiscernible.
- Keeping in mind the
desired size of the opening to show damage and the location of the kit plastic...
- ...I made
a series of cuts in the sheet plastic using an X-acto knife and scissors. These cuts
would eventually become the edges of the gaping hole in the hull.
|
 |
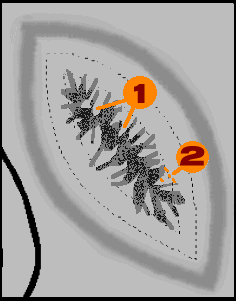
Step 3...
Now for the time-consuming part...
- Using scissors, continue to snip away at the styrene
until you have a nice, jagged opening. Each "peninsula" of plastic around
the opening now needs to be gently heated and wrenched into shape. I used a metal
dissecting probe, though a piece of 1/16 to 1/8" piece of metal rod would work as
well.
- I heated the probe in a candle and then held it close to - but not touching - the
plastic at various points. When the plastic softened, I used forceps to gently bend
and twist the plastic until it resembled blasted metal plate.
Soldering iron? No, not unless you have good heat
control. Gentle heating is the key here.
|
 |
Step 4...
Finally, using a heated dissecting needle, I picked at the edges of the plastic to add
more tiny bends and shreds. |
 |