Like any other hobby or craft, there are a few tools and supplies you'll need to have on hand to build models. This is the minimum toolset - the tools I find myself using most often.
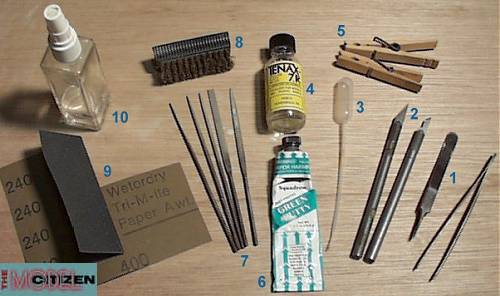
Forceps - Use them for holding onto small parts or for any other gripping job when your fingers are too large. They should have a fairly fine point. As time goes on, you'll probably accumulate a variety of sizes.
X-acto knives - You should have at least one knife handle, preferably two. I most commonly use mine with #11 blades (left) and #16 blades (right). The #11 blade is the workhorse for general-purpose cutting and trimming. The #16 blade works well for cutting kits parts away from the sprue.
Cement applicator - There are many options for this. Mine's a plastic dropper which I modified a bit. The 1/16"-diameter tip opening in this dropper is too large, so I softened the tip over a candle flame and then pulled it out to create a very thin tube at the tip - about 1/64" in diameter - and then sliced it across at an angle. This is of course used with...
Model cement - Tenax is my cement of choice for polystyrene kits. It's a liquid, solvent-type cement which produces very strong bonds between plastic parts. Solvent cements partly dissolve the styrene. When the cement evaporates, the two halves are effectively welded together. Many other types of cements are available - tube cement and superglues are most common. My suggestion is to pretend you've been through the tube cement stage. The stuff is messy, prone to leaving globs and strings behind. Plus, it just doesn't produce a strong bond. Superglues produce stronger bonds than tubes, but don't weld plastic the way solvents do. They work well in certain applications, such as when cementing clear parts, when you need a fast bond, or when using non-styrene plastics. You'll find more about vinyls and resins in the 200-level courses.
Clamps - Most model parts benefit from being clamped together while the cement bond sets up. Plain old spring clothespins will work in many cases. Over time, you probably collect a variety of sizes of clamps - some small C-clamps will be useful. Where a clamp won't fit, a piece of masking tape across a seam will work.
Filler putty - Squadron is my choice for most seam-filling needs. This type of putty is used to fill any gaps left between parts after cementing, or to fix certain molding defects in kit parts. For large gaps and repair work, you'll want a 2-part epoxy putty, such as Milliput.
Files - A good file set will be one of your most important investments. Shown here are round, square, triangular, flat, and oval files. You'll use files to clean up your cement seams and for many other finishing tasks.
Wire brush - This is a suede brush from a shoe store. It works well to dress your files (i.e. clean out the gunk that gets stuck in them), which you should do after each use.
Wet/dry sandpaper - Have a couple grits on hand. I use 240 for coarse finishing and 400 for finer work. Eventually, you may want to get some very fine grit sheets for polishing work. At the high end are the Flex-i-grit sanding/polishing films.
A spray bottle - For applying water when you're wet-sanding. A frequent spritz of water will keep sanding residue from grutting up your sandpaper or files.
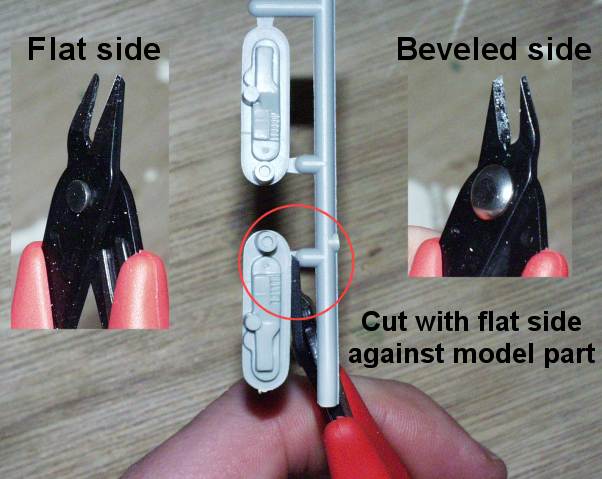
And let's not forget - nippers.
|
|
|
|
|
The Model Citizen's "Sprue U" pages are �2000 Roger Sorensen
page URL: http://employees.csbsju.edu/rsorensen/modelcitizen/sprue_u/orientation2.htm
last updated 04 December, 2007