We're coming down to the end! Your model is all built and painted and now it's time to dress it up. Decals and Details is the final step is the process. Decals can be a source of great pride and great frustration. A well-done decaling job is a thing to admire and be proud of. A poorly-done job is easy to avoid if you follow these steps.
The main thing you should look for in a decaling job is good, snug fit and adherence of the decal to the model surface so that there are no wrinkles in the surface, no bubbles trapped under the decal, and the decal allows underlying detail - panel lines, for example - to show through.
So, let's talk tools. My decaling jobs typically involve the following:

The smoother your model's painted surface, the better time you'll have getting decals to settle. A coat of clear gloss over the paint works. So does a fine-grit (600-800) wet-sanding of the model. When you've got a smooth surface, it's time to begin.
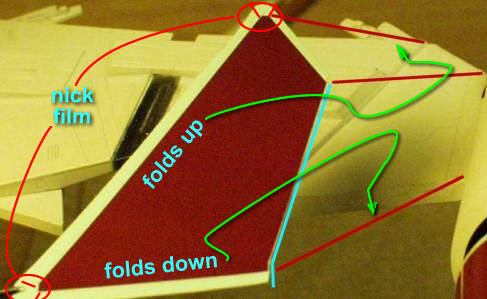 |
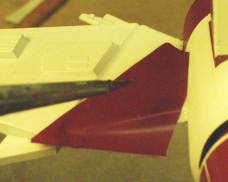
Inspect your decals and the locations
where they have to go. Anticipate where you may have to trim the decal or
make relief cuts.
Here, there's a 90� corner at the right-hand edge of the area to be decaled. The corresponding edge (blue line) of the decal film has been trimmed back. That will ease the fit of the decal into the corner. |
|
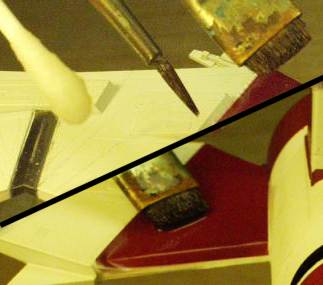
Also, the left and lower edges of the decal have to fold when applied (green) . This will stretch the film at the two circled corners. Make relief cuts here by nicking the edge of the film with a knife.
|
|
 |
Once your decal is trimmed, dip it in the water. I let large decals soak a few minutes before I transfer them to the scrap plastic. Small ones get dipped and then moved to the scrap plastic to soak. |
 |
While the decal is soaking, apply a wash of setting agent to the model surface. You should have a bubble-free, wet surface when you apply the decal. |
 |
Use a brush or swab to test the decal for looseness. when it moves easily against the carrier sheet, you can apply it to the model. |
 |
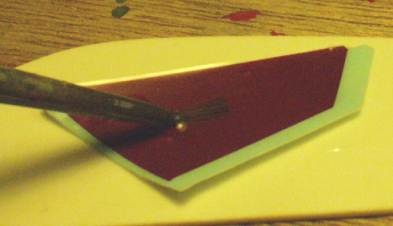
Hold the decal over its destination and
slide it onto the wet surface using a side-wise motion. This will prevent
air bubbles from becoming trapped under the decal.
|
 |
Use a brush or swab to slide the decal into position. Avoid lifting and dropping the decal - air bubbles, again. |
 |
Apply a wash of setting agent to the
top of the decal, being sure to wet the whole surface and the edges. Now sit back and wait. Wait. Wa-a-i-i-t-t |
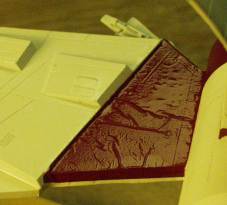 |
What the...? It's wrinkling! I gotta
fix it! No! Wait.... Part of the settling process is that the decal absorbs the agent as it softens the film. The decal's gonna pucker up. Kinda like your fingertips after a long soak. They smooth out once they dry. Just wait... trust me on this. |
 |
After several minutes, you'll begin to
see the wrinkles pulling back and the film will begin to sag into the
panel lines or snug up around raised detail. Here's where you can help by dampening a swab with agent and lightly rolling it across the decal. Use the end of the swab to tamp down on panel lines and along edges to help the decal conform. |
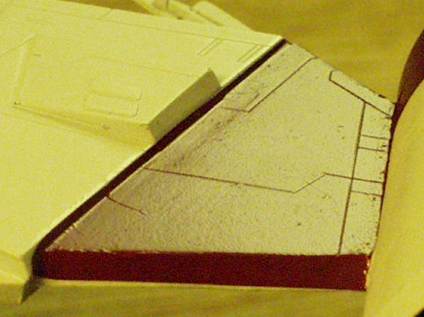 |
Wait some more... roll, tamp, wait... If you see a wrinkle that looks like it might persist, use a damp swab to lightly encourage it to settle down or lightly stroke the film toward an edge to flatten out the wrinkle. By the time the agent dries up you should have something like this - the decal has settled into the panel lines and is snug to model. Mostly... yeah, I still got a wrinkle here. |
|
|
|
|
|
The Model Citizen's "Sprue U" pages are �2000 Roger Sorensen
page URL: http://employees.csbsju.edu/rsorensen/modelcitizen/sprue_u/.htm
last updated 04 December, 2007