Sometimes, despite all best efforts, your decaling job ends up not quite right. Bubbles, "silvering," and wrinkles are the most common problems you'll encounter in a decal job.
A bubble can be removed a couple ways. If it's near the
edge of a decal, use a wet brush to try coaxing the bubble to the edge of the
decal. Otherwise, gently pierce or cut the decal with a needle or hobby knife so
the trapped air can escape. If the bubble persists, squeeze the bulb of a
dropper and place the tip onto the cut bubble. Then release the bulb to suck the
air out of the bubble.
| Causes | Solutions |
| Not enough setting agent to "float" the decal. | Make sure the model surface is uniformly wet. |
| Decal was applied straight down onto surface. | Slide or unfurl the decal onto the surface. |
| Bubbles in the setting agent. | Apply agent by flowing the brush or swab across the surface, don't daub it. Check for bubbles before applying decal. |
If you notice silvering occurring as a decal dries, try to get some more setting agent underneath the decal. Usually you can "wiggle" a wet brush under the edge of the decal to get more agent in there. Be sure not to introduce bubbles in the process. If the model surface is irregular (panels lines or other detail) try a more aggressive setting agent - e.g. use Micro-Sol instead of Micro-Set.
| Causes | Solutions |
| Not enough setting agent to fully settle the decal. | Make sure the model surface is uniformly wet before applying decal. |
| Model surface too rough (flat paint finish). | Polish or gloss-coat the model before applying decals. |
If you notice a wrinkle persisting as the setting agent dries, use a wet brush to try coaxing it to flatten out - gently brush over the decal between the wrinkle and the edge, or tamp it with a damp swab - you may be able to flatten the wrinkle enough, or split in into a couple smaller wrinkles.
Sometimes wrinkles occur where a decal has too much heavy detail to deal with, or over sharp corners and compound curved surfaces.
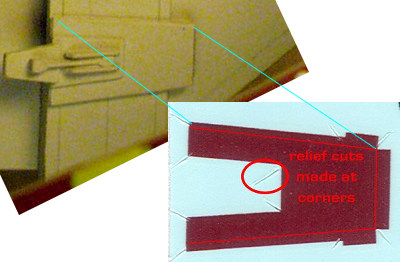 |
Sharp corners Nick the decal film with a sharp hobbly knife. It will have an easier time wrapping over sharp corners without bunching up. |
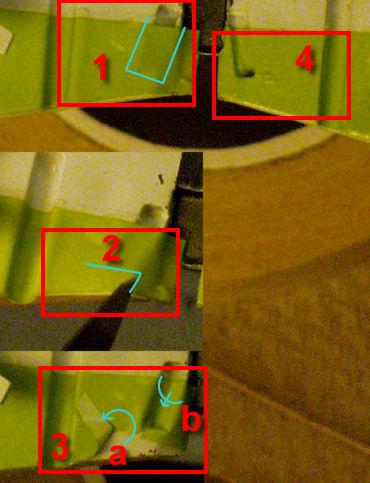 |
Here's a tricky example from
the Fine Molds Jedi Starfighter.
1. This decal has to both fit over a smooth surface and into a deep depression (blue outline). 2. Carefully cut the decal (blue line) so that you have a short flap. 3. (a) Fold the flap over and then (b) press the decal into the depression. Then flip the flap back down. 4. The end result is a decal smooth on the flat surface and in the depression. Without the cut & flap routine, the would have been a big wrinkle where the shadow is. |
|
|
|
|
|
The Model Citizen's "Sprue U" pages are �2000-2004 Roger Sorensen
page URL: http://employees.csbsju.edu/rsorensen/modelcitizen/sprue_u/191.htm
last updated 04 December, 2007