These thumbs link to pages & galleries for some other work where I've used these techniques...


Chalk up another finished model -- literally.
One of the quickest ways to get a good detailing or weathering job on a model is to use artist's pastels. The variety of colors they come in, speed of application, and level of control you have makes this an excellent method for applying that final level of detail to your kit. You can even fix a mistake with soap & water on a cotton swab. I still do paint-weathering too; one things pastels won't do is flow into cracks and crevices. I tend to use the pastels for details such as spots of dirt & grime, battle damage, scorch marks, oil streaks, or panel shading.
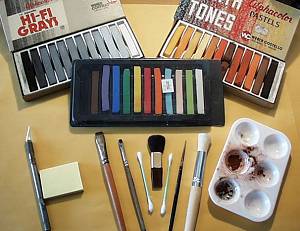
| You will want at least two sets of pastels: greys and earth-tones. A set
of landscape colors may be useful too. I pick the shading color(s) based on the color of
the underlying paint and the nature of the weathering. For applicators, I'll use a variety of things, depending on the type of weathering and size of area to be weathered. Some of the applicators I use are:
You'll also want:
|
 |
Scrape the pastel so you have a small pile of chalkdust. If you're shading panels, then mask off the panel (or at least one or two edges of it) to be weathered or shaded. Pick up the dust with your applicator and apply the dust to the model. You can daub and stroke the loaded applicator right onto the model. This works well for doing panel shading or large areas of fogging or grime. Alternatively, you can hold the applicator above the model and tap it so that dust sprinkles onto the surface. (If you get too much dust on the model, just blow off the excess.) Use a flat paintbrush or a soft toothbrush to streak out the dust particles. This works well for exhaust marks, oil streaks.
Practice, practice, practice. Paint some scrap plastic or a model you're not emotionally attached to and have at it with your pastels & brushes. The more pastel dust you pick up, the more intense the shading will be. (Well, Duh!). Vary the pressure of your brushstroke, the direction, whatever you can think of.
Wear gloves!! I wear white cotton gloves - some hobby shops carry them, otherwise check at a camera shop. Pastel dust will quickly absorb fingertip moisture and oil. Imagine the horror of seeing a fingerprint in your beautiful new weathering job. But, if you do manage to get a fingerprint on your model, just dust over it. It'll go away with a little extra work. If you're desperate, use soapy water & a cotton swab to wash off the offending spot.
Apply the weathering to a flat-finish surface. The dust will not adhere to a glossy surface. If you're going to apply pastel weathering over decals, apply a dullcote first.
Be sure to apply a dullcote over the pastel work when you're done. Remember using your mum's hair spray to seal those chalk drawings of your youth? Same idea.
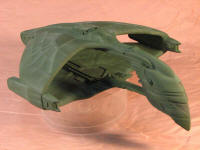
BUT...! Odd note on using light-colored chalk on a darker surface - my Romulan Warbird was a case in point - it didn't like having a coat of sealer (Testor's Dullcote) applied. It would either vanish or sort of bead up. So, the finished model has no sealer coat.
 |
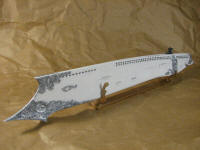
The Britannia II was shaded mostly with a 1/2" wide, 1/4" long flat brush. I masked off a panel or edge with sticky-notes, then brushed dust over the panel or along the masked edge. The only paint in these pictures is the light gray main color and blue-gray accent color (OK, and the black & yellow spots). |
 |
Mud-caked models anyone? Scrape up & mix some
black/brown/ochre/green dust. With a brush, apply some dullcote to the area to be muddied
- in this case, the base of the landing gear. Then work pastel dust into the wet dullcote.
Make it nice'n'chucky. It's gives a nice grutty (that's grungy, gritty) appearance to the
model.
|
|
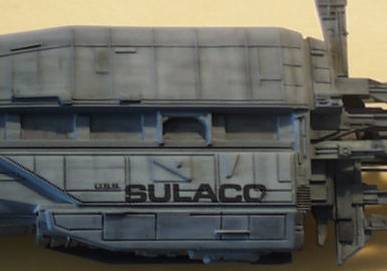
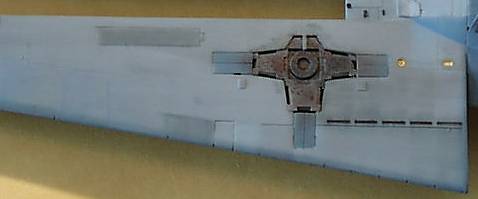
The Sulaco
used a mix of mask & brush shading, like the Britannia,
and toothbrush shading. The fine streaks - for instance, the ones above the U.S.S. - were
made with a toothbrush lightly dipped in dust. Cargo bay doors You might (@*# lighting) also be able to spot a zigzag on the cargo doors. I cut the zigzag from sticky-note paper, then shaded along the edge. |
|
|
|
|
|